Monday, June 15, 2015

How To Plump Up Your Lips!


Okay ladies,
Here I'm going to share with you on how to plump up those lips!
I'm going to start off with what product I used. In the first picture, I used the upper left color. (any light, highlighting color will do). I took this color onto a make up brush and lightly dusted it onto my cupid's bow. (upper lip)
*If you want a less concentrated look, use your finger, if you want a more concentrated "pop", use a precise make up brush.*

Second Picture:
I used the Urban Decay Naked 3 Palette for the "shadowing" part of the lip. I took the color "Factory" and dusted it on the center of the UNDER-SIDE (not ON the lip) of my lower lip. Again, if you want it more concentrated use your brush. If not, use your finger. I prefer using the brush for both techniques, only because I like it neat and defined.

Once these two steps are done, add a clear gloss of any kind. If you REALLY want it to "pop", use a "Plumping" Lip Gloss. You can pick those up at any Walmart, CVS or Rite Aid. I purchased mine at Bath and Body Works for $7.

Before and After is at the bottom! :-)


*Don't forget that your face is a blank canvas EVERY day! Play with your make up and have fun with it!!*

XOXO


Wednesday, May 6, 2015

My Current Shampoo and Conditioner!

 Here is my new Shampoo and Conditioner that I am currently using and REALLY liking! The "Shea Moisture" brand! 
Picture 1 is of the Shampoo. In case you can't read the label, I'll list what this Shampoo does. 

This sulfate free Shampoo helps moisturize and repair dry, damaged or over-processed hair. (yes, it does!) 
It is infused with Sea Kelp, Argan Oil and Shea Butter to leave your hair super soft! What this Shampoo is FREE of:


  • No sulfates
  • No parabens
  • No Phthalates
  • No Paraffin
  • No gluten
  • No Prophlene Glycol
  • No Mineral Oil
  • No Synthetic Fragrance
  • No Synthetic Color
  • No DEA
  • NO Animal Testing
The Conditioner that I chose is NOT the 
matching conditioner. The "Renewal System" is what caught my eye! Here's what it does for your hair:

  • Age-defying
  • Color Protect
  • Hydrates
  • Nourishes
  • Softens
  • Anti-Stress
  • Shine (without greasy residue)
  • Gives your hair manageability
  • Revives Body
  • Strengthens
(This conditioner is FREE from all the products listed above as well)


This conditioner is VERY light and doesn't weigh the hair down at all that I noticed. My hair is SO soft and has a lot more body than usual! The smell to both of these products are amazing! Nice, soft fragrance..not over-powering at all. 

The only CON to this product is that you have to wash your hair more often. Since this product isn't stripping your hair of it's natural oils, you tend to have to wash it more. Compared to how my hair smells, looks and feels, it's a small price to pay.

**EXTRA TIPS** 
Here is how I keep my hair smelling like the Shampoo and Conditioner even AFTER blow drying and styling: 
Use the "cold shot" option on your hair dryer! It's SO much easier on your hair. Yes, it takes longer to blow dry but in the long run; it's worth it. 
After you style your hair, give it another "cold shot". This will set the look and close the cuticle, leaving your hair SUPER soft! 
That's all I have for now! Keep in touch for more product review! XOXO

Sunday, April 26, 2015

Soap and Salve Product Review!!

**All off these products are made with all natural ingredients! I was not in any way paid to advertise these products. I just wanted to share them with you because I personally like them..a lot!**

(Picture 1) To the right is the Face and Eye Moisturizer. This product is AMAZING! Very light, fluffy texture and it doesn't leave you too greasy. It moisturizes all day long even after make up is applied! $10.25 for a 1 oz jar but a little goes a long way!

(Picture 2) The Mocha Java Body Polish is a great product thus far as well. It smells SO good! Just as you guessed, Chocolate and coffee smell. It has actual coffee grounds in it which is really good at fighting against cellulite and it's a great exfoliate. I only apply this to "problem areas". Us ladies each have our own so, no need to elaborate. :-)
This 10 oz jar was $16.50 but it lasts long as well! You also have the choice of a 1.5 oz for $6.25.

(Picture 3) The Coconut and Honey Face Polish. I've only used this once and it exfoliated well and left my face feeling smooth. It may be sticky at first because of the honey but once you rinse, it's nice and soft. 1 oz jar $5.95 or you can choose a bigger size at 5 oz for $14.25

(Picture 4) Mocha Java Lip Butter. FABULOUS! I apply this lip balm before bed and it leave them soft and moisturized. Plus..it tastes like coffee and chocolate...good luck not licking it off your lips and actually KEEPING it on your mouth. :-D I received this as a FREE gift! The packaging was nice and I received a personalized card from the person who packaged my order.

Keep in mind, I have very sensitive skin and
applying oils to my face usually ends badly but
not with this product!! I haven't broke out AT ALL from it. I highly recommend this to any and all skin types.

Cleanser: At the end of the day, I use Pure Organic Coconut Oil to clean my face. It removes make up wonderfully and smells delicious! Again, I wouldn't normally do this because my skin is usually sensitive to oils, but this stuff is wonderful! The key to cleansing with Coconut Oil is to steam it. Apply to the skin first, then steam your face with a hot (as hot as you can take it) towel or washcloth. Then remove make up and cleanse.
The links to the product is listed below!


Face and Eye Moisturizer:
http://www.chagrinvalleysoapandsalve.com/products/for-the-face/moisturizers/whipped-butters

Mocha Java Body Polish:
http://www.chagrinvalleysoapandsalve.com/products/details/for-the-body/scrubs/body-polish-mocha-java

Coconut and Honey Face Polish:
http://www.chagrinvalleysoapandsalve.com/products/details/for-the-face/scrubs/face-polish-coconut-honey

Mocha Java Lip Balm (in case you want extra or a different flavor):
http://www.chagrinvalleysoapandsalve.com/products/details/for-the-face/lip-butter-balms/mocha-java-lip-balm

ENJOY!


Tuesday, April 21, 2015

Update!

Updated skin care coming soon! I just ordered a BUNCH of ALL NATURAL skin care products that I am very excited to do a review on! 
I'll have it up, along with the products and links, within the upcoming week! XO

Make-Up Tips!

Lets start with make up brushes! Here are the ones that I purchased from Amazon a couple of months ago (I will post link below). These brushes are awesome! There are brushes in here that are great for liquid foundation, powder foundation, blending brushes, crease color, highlight and contour etc. Pro and Cons:

Pros:


  • They are sturdy, durable brushes.
  • Very little shedding. I have washed them 2-3 times already and I MAY have lost 1-2 hairs from it. 
  • They have synthetic fibers which is what I prefer. They don't rob you of product, unlike natural fibers. Product sits nicely on the top layer of synthetic brushes, whereas the natural fiber brushes absorb product. To me, that's a waste. I want it on my face, and not accumulating at the base of my brushes. 
  • They're soft. Most synthetic brushes that I've used have a rough texture, but these are perfect.     
Cons:

Only one con. The packaging and brushes themselves have a funky smell to them when they  arrive. The smell reminded me of a sharpie marker. All I did was wash them with soap and water, wiped them down with sanitizing wipes and disinfectant spray and the smell went away! It went through all of that scrubbing and STILL kept their shape and hairs. Good brushes in my book. :-)

Now, let's move on to care. PLEASE wash your make up brushes!! You don't have to buy all the fancy brush cleaners because most of them are filled with chemicals that you don't need on your skin anyway! Just take some Dawn and dilute it with water and wash them. Lay them flat to dry, or you can stand them up in your brush holder. They reshape themselves nicely. If you want, you can manipulate them a bit while they're wet to round them back out but..I haven't needed to do that much with them. Washing is very important because over time, your brushes collect bacteria. So wash up! 

====> **Another tip that I forgot to add yesterday- Keep your pillowcases clean!! They also collect dirt and oil that you may have missed when you washed your face.**

Another thing you want to do before caring for your face or make up utensils is..you guessed it...wash your hands! Your hands are loaded with germs and bacteria (but we know this). All you will do is end up transferring the bacteria to your skin, and if your washing your face with warm water and opening up those pores...guess what moves right in? I would avoid touching your face altogether if at all possible through the day. This will help keep your skin free of germs :-) No biggie if you accidentally do because if your wearing make up, it's more than likely creating a small barrier anyway.  

Enjoy putting on your make up and creating fun looks! Just do it with clean hands and utensils! XOXO

 Here is the link to the make up brushes: 

http://www.amazon.com/Synthetic-Cosmetics-Foundation-Blending-Eyeliner/dp/B00LVX262A/ref=sr_1_1?s=beauty&ie=UTF8&qid=1429637803&sr=1-1&keywords=party+queen+brush+set

ENJOY! 


Wednesday, December 10, 2014

Black and Silver Bling Nails!

This is a very easy (but time consuming) look! Here is what you'll need:


  • Revlon Brand in the color "Black Magic"
  • Sally Hansen brand in the color "Celeb City"
  • Rhinestones (clear)
  • Toothpick (to apply the rhinestones)
  • Top Coat in the brand "Out the Door" (my favorite!)
  • Q-tips and Polish Remover for clean up
First, paint your index, thumb and pinky with 1-2 thin coats of black.
Next, apply 1-2 thin coats of the metallic silver color to the middle and ring fingers. Let all dry.
Next, apply Top Coat to the entire ring finger nail. Apply the outer line of rhinestones first (that way the middle ones have something to adhere to later). Next, apply a little more top coat where there is no rhinestones. This will cause a "wall" of top coat and the rhinestones will kind of smooch together and the top coat will ooze out up the sides. Apply them with a wet tipped toothpick. As you are applying the rhinestones, be sure to GENTLY push down on them as you stick them on.
After you've applied them onto the whole nail, gentle press down on the whole nail with your finger to be sure everything is in nice and tight. You can put top coat over the rhinestones. I skip this step because the rhinestones I have lose their shine if I do...don't want that. They are BLING after all ;-) Apply top coat to the other nails and when they are dry, you're done!!

Tuesday, December 9, 2014

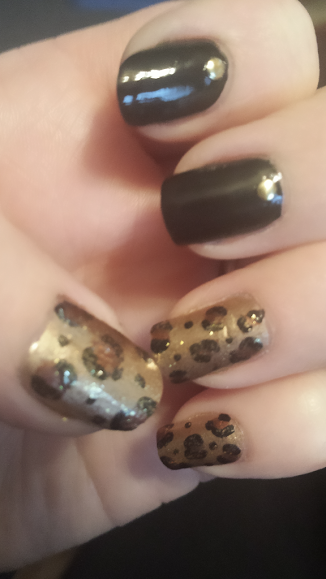
Black and Leopard Nail Look with Gold Studs!

I actually kept this look for a WHOLE WEEK! Record breaker! Haha! Here is what I used to accomplish this look: 


  • Sinful Colors brand in the color "All About You"
  • Sinful Colors brand in the color "Gold Medal"
  • Revlon Top Speed brand in the color "Black Magic"
  • Pure Ice brand in the color "Magic" 
  • Small Nail Art Brush
  • Things needed for clean up :-)
  • Toothpick to apply the gold studs
  • Top Coat
First, paint the index and middle finger black. Two thin coats should do it. 
Next, paint the ring, pinky and thumb the tan color. 
After that, apply the leopard print. First, add dots sporadically onto the nails that require the leopard print. Then, with the black polish, add the "C's" around the dots. (For the dots, I used a slightly darker brown. (Pure Ice Magic)). 
After those dry, apply the tan glitter polish ("All About You")
Next, apply the studs. All you have to do is dab a dot of top coat where you want the stud. Then, use the toothpick to apply it. TIP: Wet the end of the toothpick with water to get the stud to stick easily. 
After all is dry, apply topcoat and you're done!!